In this post we will first check the configuration in details required for material master creation in S4 HANA. We will keep configuration minimum possible & use of SAP standard wherever possible.
Table of Contents
1. Material Master related configuration
Below are the main configuration required to create material master
1.1 Material Type
Grouping of similar attribute materials . For example -Raw materials, Semi-finished products, or finished products.
Material type determines
- If the material is intended for a specific purpose such as a configurable material or process material.
- Material number is assigned internally or externally.
- The number range of the material number.
- Which screens appear and in what sequence
- Procurement of the material -manufactured in-house or procured externally, or both
We will use below SAP standard material type
- ERSA Spare Parts
- FERT Finished Product
- HALB Semifinished Product
- HAWA Trading Goods
- LEER Empties
- LEIH Returnable packaging
- ROH Raw materials
- VERP Packaging
- HAWA Trading Goods
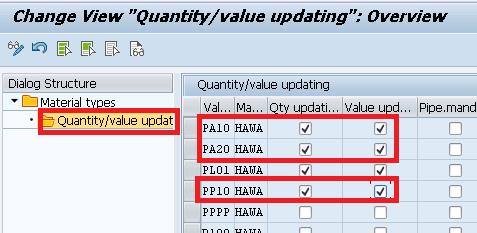
Below is the configuration for let,s say example – Trading Goods (HAWA)
Transaction code – OMS2

Now click on “Quantity/value updating” & select “QTY Update” & ” Value Update” for your all material type in all your plants (Valuation Area)
So we have selected for our valuation areas PA10, PA20 & PP10
1.2 Define Number Ranges for Each Material Type
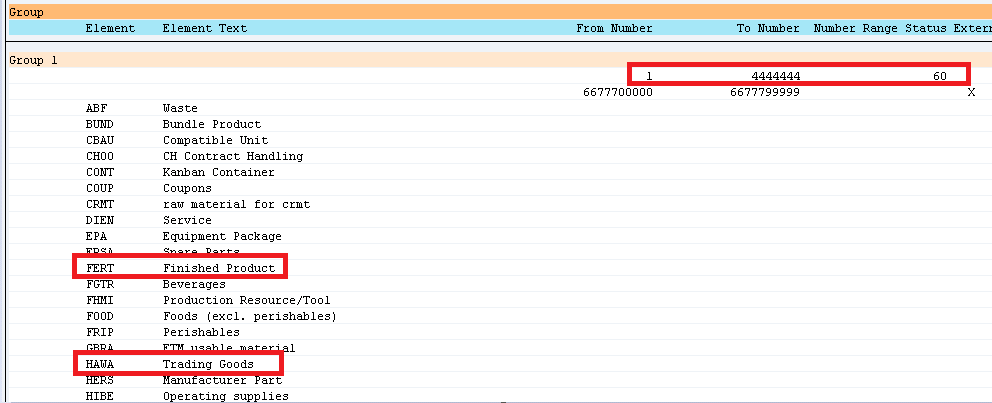
Here we define the type of number assignment and the number range intervals for material master records. When creating a material master record it is must to assign it a unique number. There are two ways of doing this
1.2.1 Internal number assignment
In this case, a number within the number range interval allowed is assigned by the SAP system. Currently, the maximum length allowed for an internal number is 18.
1.2.2 External number assignment
Here, the user assigns a number within the number range interval allowed. You can define the intervals for external number assignment numerically and alphanumerically. For integration purposes, SAP, currently, allows only the number range length of 18 characters.
Transaction Type ; MMNR
Now let,s create our first material
2. Create your First material in S4 HANA
Here we will create different materials to be used for our car business
2.1 Creation of “Trading Material” -Mat Type “HAWA”
Time needed: 5 minutes
How to Create your first Material in SAP S4 HANA
- Go to MM01 and enter below on the Create Material (initial screen)
Material Code – PA0101-01
Material Type -HAWA
Industry Sector – M Mechanical Engineering
Press enter - Select the views to be created (Presented from the material type config OMS2)
Enter organization structure in which material is to be createdPlant -PA10 (PPIC Chicago Plant)
Sales Org -PA10 (IC Car Sales Organization)
Distribution Channel – PA (Car Dealers)
Press enter
- On Sales : Sales Org. 2 view
Enter General Item Category – NORM
Enter Item Category Group – NORM
Acct Assmt Grp Mat. – PA (Products)
Gen Item Category for 3rd party subcon party : for third party subcontracting process, we use general item category as BADS
Through this item category BADS , system determines Item category “RADS” for 3rd Party Subcontracting
Item Category Determination for 3rd Party Subcontracting - On “Basic Data 1” view
Enter Description – “First PA01 Material for Car Dealership”
Enter BUOM – PC
Enter Division – SR (Spare Parts)
Enter Material Group – PA10 (IC Car Parts Light)
Gross Weight – 20 KG
Net Weight – 18 KG
Material “Packaging Level”
1 “CARTON” of Material “66” = 6 “PC”
1 “PALLET” of Material “66” = 8 “CARTON”
1 “PALLET” of Material “66” = 48 “PC” - On Sales : Sales Org. 1 view
Enter Delivering Plant -PA10
Enter Tax Classification -1 (Taxable)
- On Sales : General/Plant view
Enter Availability Check -KP (No Check) – We will configure this and then activate this for another Material
Enter Batch Management -Selected
Enter Transportation Group – PA10 (Normal Transport)
Enter Loading Group -PA10 (Manual Load)
- On MRP 2 view
Enter “Storage loc. for EP” as -PP1A -Std. SLOC, This will be defaulted in PO and flows to the subsequent Inbound Delivery.
Please note that if we want this material to be handled in EWM, then we need to select a Storage location, connected with EWM warehouse in the field “Storage loc. for EP”.
- On MRP 4 view
Click on “Production Versions” button under sub screen “BOM Explosion/ Dependent Requirements”
Input production version here . It is required for BOM determination in subcon PO. Please see below post to see the details
- On Plant Data / Stor. 1 view
Enter Storage Condition as P1 (IM Managed stock) – Based on this we can configure different picking SLOC , based on if SLOC is IM managed, WM managed or EWM managed.

- On Accounting 1 View
Enter Valuation Class as 3100 -Trading Goods.
ML Active checkbox should be already selected and greyed out. If this is not selected then stop here and check ML activation through below given link to the corresponding post
Enter price control “V” and price as 13 USD
- Save the material and you have created your first material successfully !
HINT
On Step 9 “ML Active” checkbox should be already selected and greyed out. If this is not selected then stop here and check ML activation through the link given below.
How to activate Material Ledger in S4HANA in 5 Easy Steps
2.2 Creation of “Packaging Materials” -Mat Type “VERP”
As per definition provided by SAP- “Packaging materials are intended to enclose or hold together the materials that are to be packed. In other words, the material that is to be packed can be packed into or onto the packaging material. The packaging material can be a load carrier. The most important packaging materials include crates, boxes, containers, wire baskets, and pallets”
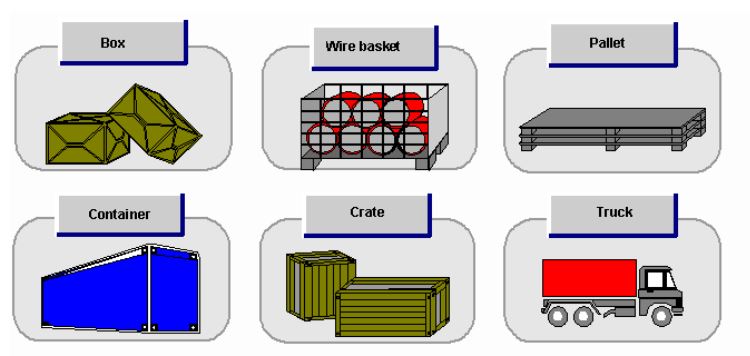
We will create two packaging material
- Packaging Material CARTONSTD -CARTON WITH SSCC GENERATION
- Packing Material PALLETSTD – PALLET WITH SSCC GENERATION
a) Packaging Material CARTONSTD -CARTON WITH SSCC GENERATION
TCode – MM01, Select Material type as “VERP” – Packaging Material

Packaging material type Standard Carton “SCAR” assigned to packaging material “CARTONSTD”

b) Packaging Material PALLETSTD – PALLET WITH SSCC GENERATION
T-Code – MM01, Select Material type as “VERP” – Packaging Material

Note : Please see the below post to see the packaging material type “SCAR” & “SPAL” configuration in detail
Unlock SAP Efficiency: Master Handling Units Now! – Create the Packaging Materials
3. Extension of Material to Other Plants
There are business cases where we need to extend the materials to other plants.
3.1 Extension to intra-company Plant – Business Case
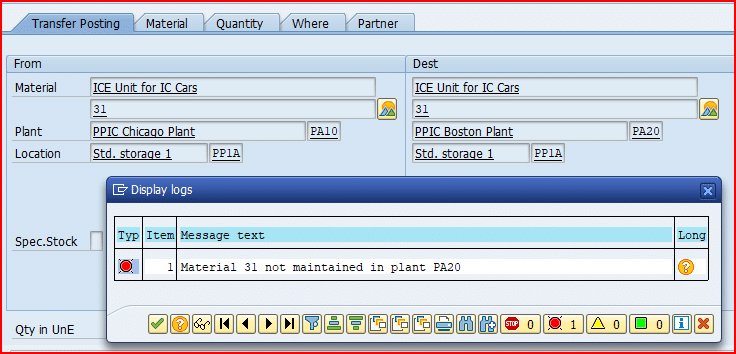
In order to work with stock transfer/stock transport order , it is mandatory to extend the material in both the plants. This means the material should be available in both receiving & sending plants
We need to extend our materials to our other plants in order to be able to do Stock Transfers & STOs
System will throw an error while transferring the stock or creating the STO , if the material is not extended to receiving plant
3.2 Extension to intra-company Plant
As per our organization structure We have two plants PA10 & PA20 assigned to PA10 company code as shown in below picture

First we will extend our material to PA20 plant which is assigned to same company code (PA10) as PA10 plant
To extend the material Start MM01
- Enter material as “66”
- Enter “Copy from.. Material as “66”
Press Enter
System will copy Material type and industry sector from master record as shown in the below screenshot

Select all the views
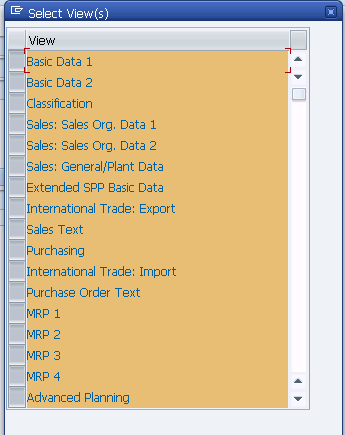
press enter and system will present source & destination organization levels as shown in the below screenshot
Fill the details as shown in the below screenshot
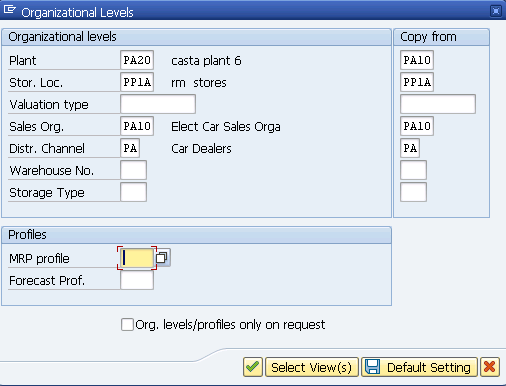
Note : Sales Organization PA10 serves for both the plants PA10 & PA20.
Please click HERE for details of assignment of plant to sales organizations.
Press enter and system will automatically select extendable screens one by one.
You will be presented “Classification” screen.
Since we have not configuration yet so just come out from this screen by pressing the “Next Screen” button.
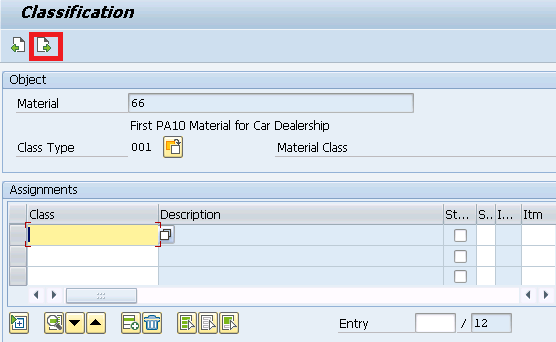
You will be presented the “Sales : sales org. 1” screen
Enter Delivering Plant “PA20-PPIC Boston Part”
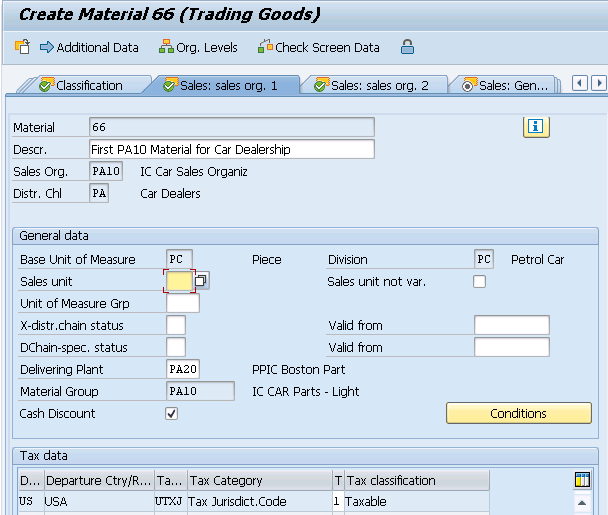
Press enter and you will be presented “Sales : sales org. 2” screen
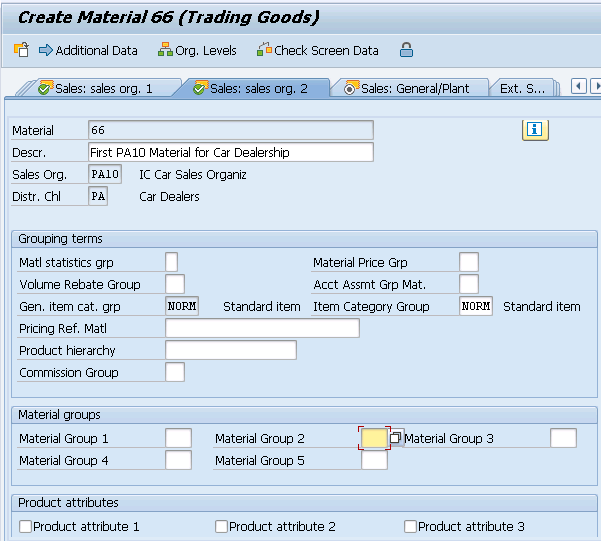
We are not changing anything on the above screen so just press enter and system will present “Sales : General/Plant” screen
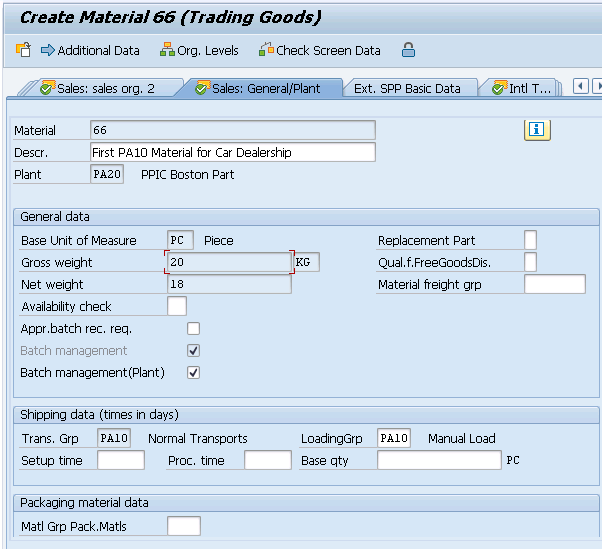
We are not changing anything on the above screen so just press enter and system will present “Intl Trade : Export” screen
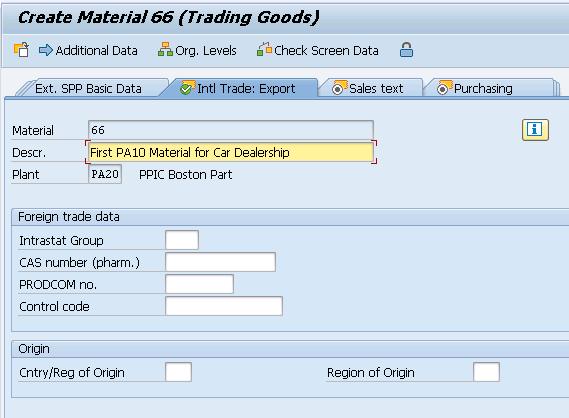
We are not changing anything on the above screen so just press enter and system will present “Sales text” screen
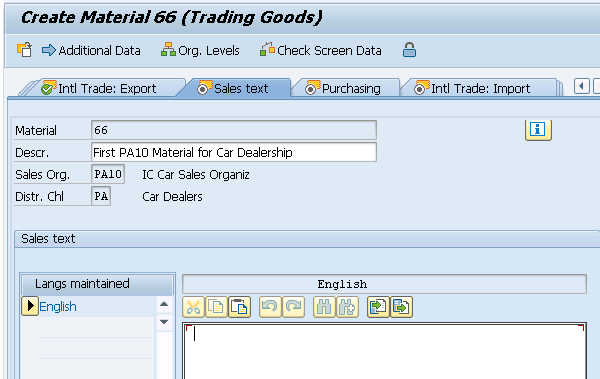
We are not changing anything on the above screen so click on “Purchasing” screen
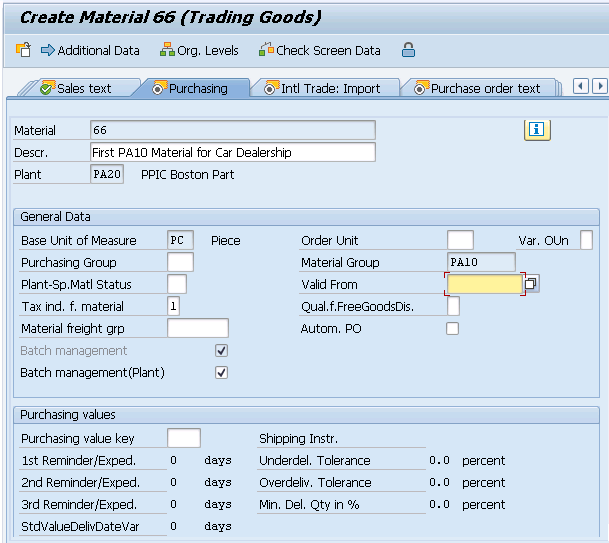
We are not changing anything on the above screen so just press enter and system will present “Intl Trade : Import” screen.
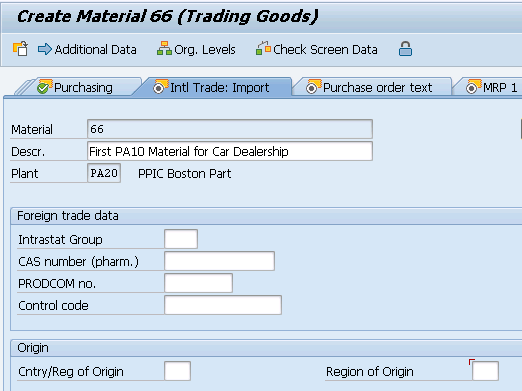
We are not changing anything on the above screen so just press enter and system will present “Purchase order text” screen
We are not changing anything on the “Purchase order text” screen, so click on “MRP 1” screen
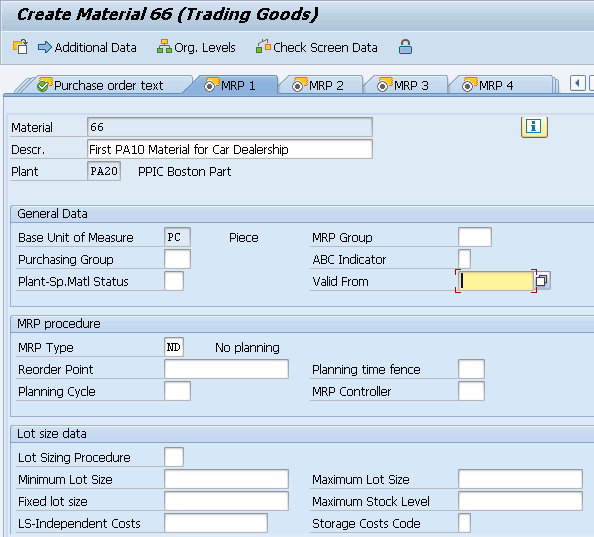
We are not changing anything on the above screen so just press enter and system will present “MRP 2” screen

We are not changing anything on the above screen so just press enter and system will present “MRP 3” screen
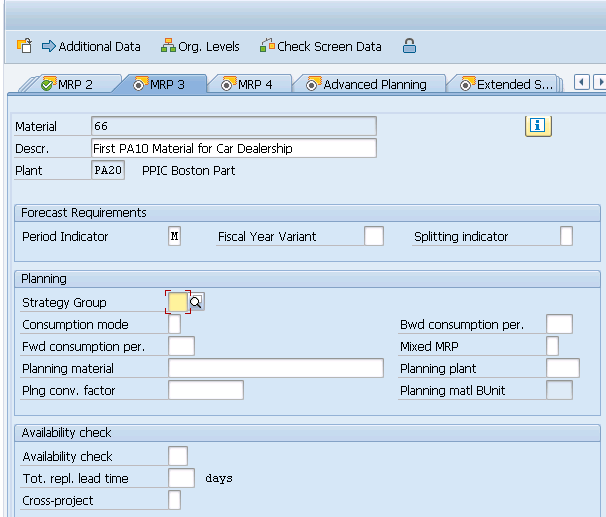
We are not changing anything on the above screen so just press enter and system will present “MRP 4” screen
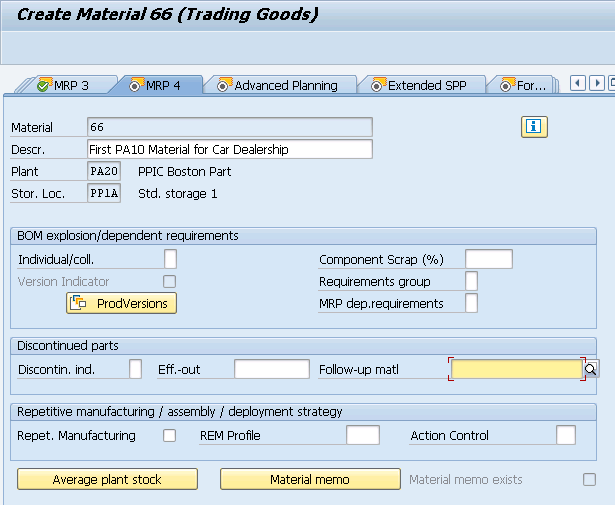
- We are not changing anything on the above screen so just press enter and system will present “Advance Planning” screen .
- We are not changing anything on the “Advance Planning” screen, so just press enter and system will present “Forecasting” screen
Enter Forecast Model as “N-No forecast/external model”
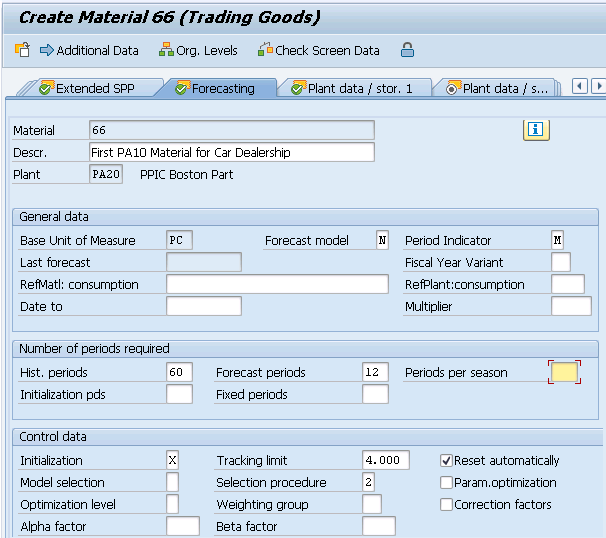
We are not changing anything on the above screen so just press enter and system will present “Plant data / Stor. 1” screen
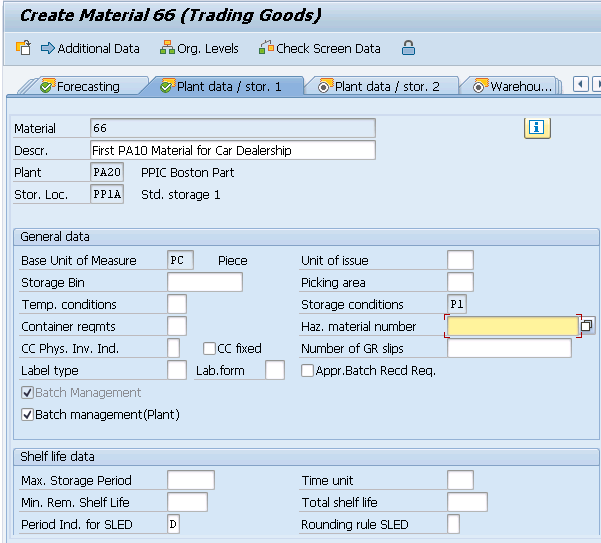
We are not changing anything on the above screen so just press enter and system will present “Plant data / Stor. 2” screen

We are not changing anything on the above screen, so just press enter and system will present “Quality Management” screen
We are not changing anything on the “Quality Management” screen, so just press enter and system will present “Accounting 1” screen
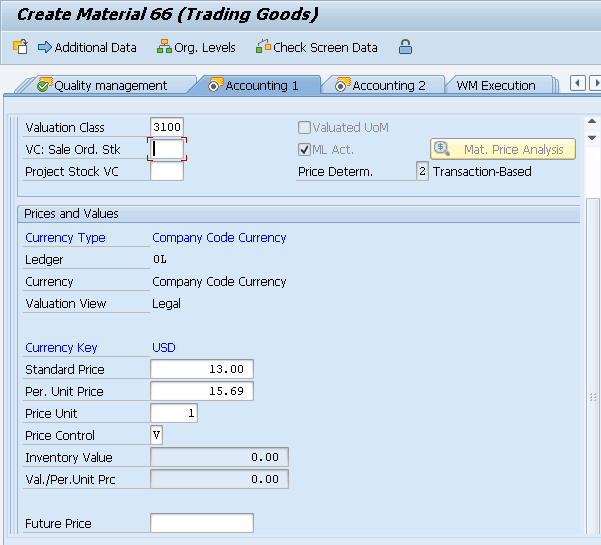
In the above screen Price is showing as 15.69 USD per price for this material in PA10 Plant
Let,s assume that this material costs 20 USD in PA20 plant due to cost of living difference , overheads etc.
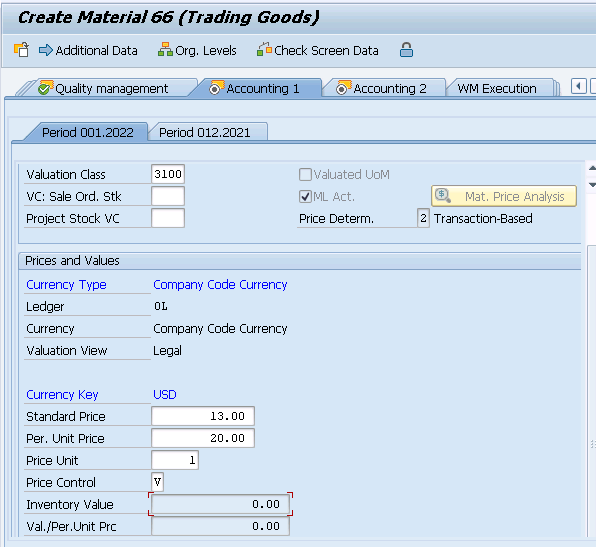
After changing the price, press enter and system will present “Accounting 2” screen
We are not changing anything on the “Accounting 2” screen, so just press enter and system will ask to save.
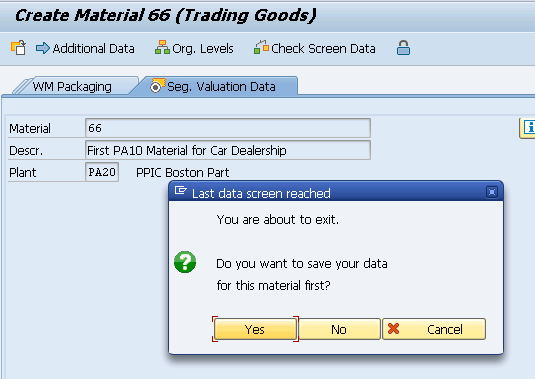
Material is now extended to PA20 Plant.

3.3 Extension to inter-company Plant
We have two companies PA10 & PP10 with plant assignment shown as below

Now we have extend our material to the PP10 plant which is assigned to the different company code PP10.
To extend the material Start MM01
- Enter material as “66”
- Enter “Copy from.. Material as “66”
Press Enter
System will copy Material type and industry sector from master record as shown in the below screenshot

Enter source and destination organization structures
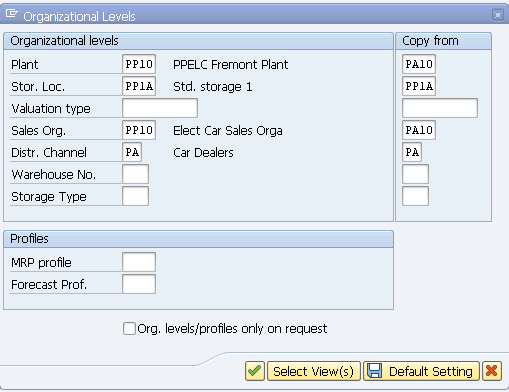
You will be presented the “Sales : sales org. 1” screen
Enter Delivering Plant “PP10- PPELC Fremont Pl”
Also Electrical plant is tax exempt so select Tax classification as “0-Exempt”
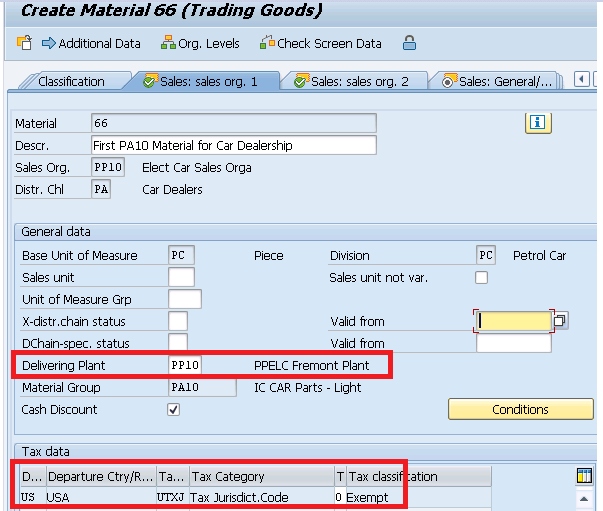
Press enter and you will be presented “Sales : sales org. 2” screen
We are not changing anything on the “Sales : sales org. 2” screen so just press enter and system will present “Sales : General/Plant” screen
Change loading group to “PP10-Manual Load”

- –> We are not changing anything on the above screen so just press enter and system will present “Intl Trade : Export” screen.
- –> We are not changing anything on the “Intl Trade : Export” screen so just press enter and system will present “Sales text” screen.
- –> We are not changing anything on the “Sales text” screen so click on “Purchasing” scree.
- –> We are not changing anything on the “Purchasing” screen so just press enter and system will present “Intl Trade : Import” screen.
- –> We are not changing anything on the above screen so just press enter and system will present “Purchase order text” screen
- –> We are not changing anything on the “Purchase order text” screen, so click on “MRP 1” screen
- –> We are not changing anything on the MRP 1 screen so just press enter and system will present “MRP 2” screen
- –> We are not changing anything on the MRP 2 screen so just press enter and system will present “MRP 3” screen
- –> We are not changing anything on the above screen so just press enter and system will present “MRP 4” screen
- –> We are not changing anything on the above screen so just press enter and system will present “Advance Planning” screen .
- –> We are not changing anything on the “Advance Planning” screen, so just press enter and system will present “Forecasting” screen
- –> We are not changing anything on the above screen so just press enter and system will present “Plant data / Stor. 1” screen.
- –> We are not changing anything on the above screen so just press enter and system will present “Plant data / Stor. 2” screen.
- –> We are not changing anything on the above screen, so just press enter and system will present “Quality Management” screen.
- –> We are not changing anything on the “Quality Management” screen, so just press enter and system will present “Accounting 1” screen.
In the above screen Price is showing as 15.69 USD per price for this material in PA10 Plant
Let,s assume that this material costs 20 USD in PP10 plant due to cost of living difference , overheads etc.

After changing the price, press enter and system will present “Accounting 2” screen
We are not changing anything on the “Accounting 2” screen, so just press enter and system will ask to save.
Material is now extended to PP10 Plant.

4. Creating the material for S4 HANA EWM
We have seen the material creation for the S4 or ECC part in the above sections of the post.
Now we will create the material to use in EWM. We will review the material creation for both S4 HANA embedded as well as decentralized EWM on S4 HANA options
We will first review the difference between creation of material in embedded & decentralized EWM
--> Please note that in order to be able to distribute the delivery to the EWM system, the material given in Purchase Order/Inbound Delivery should be created for a storage location which is connected to a EWM warehouse. Check the below posts for detail

--> Configure SAP S4 HANA Material Management Organization Structure in 5 Minutes-Create Storage Location

--> Configure SAP S4 HANA Logistics Execution Organization Structure in 5 Minutes-Assign Warehouse Number


--> Storage location in the Purchase Order & subsequent to Inbound delivery flows from the "Storage Location for EP" field of "MRP2" view of the material master. Please check the detail HERE
4.1 Material Creation Difference-Embedded Vs Decentralized EWM
Before understanding the difference, we need to understand that whenever we create the material, it is first created in SCM (i.e., APO stack)
We can display the material in “/SAPAPO/MAT1”. Here all fields are replicated from S4/EWM and get overwritten with update in S4/EWM
Now once material is present in SCM/APO, we can then extend (create) this material for our Warehouse. We use “/SCWM/MAT1” for this
--> Creating the material in SCM/APO is like creating the material globally in EWM instance (logically in case of Embedded EWM & Separate sever in case of decentralized EWM).

--> Second level is to create/extend this material in our Warehouse. It is mandatory to have the material in SCM/APO (step above) to be able to create material for our Warehouse.
4.1 Creating Material for Embedded S4 HANA EWM
As explained above we will first create the material in SCM/APO.
We will create material “Battery “
4.1.1 Material Creation in SCM/APO
We create the material first same as we create in S4/ECC normally.
This material creation is already explained in the step 2, so we have created this material offline.
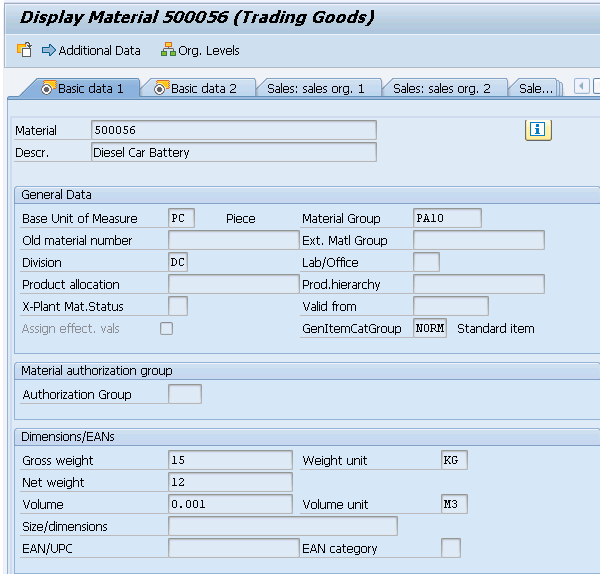
In case of Embedded EWM, as soon as we create this material in S4/ECC through MM01, it is available in SCM/APO
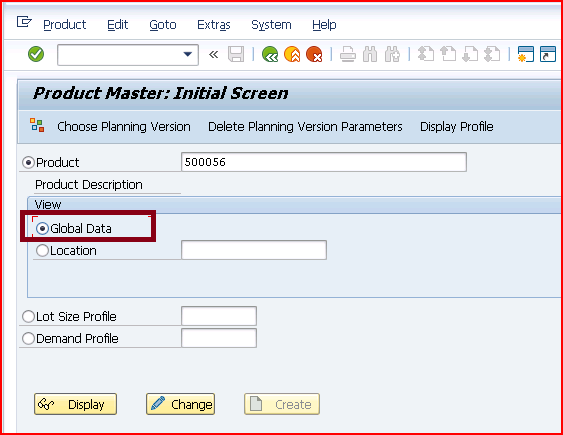
Run /SAPAPO/MAT1.
Input material number & choose “Global Data” radio button.

4.1.2 Material Creation in Warehouse
Since we have already fulfilled the prerequisite of material creation in warehouse (Material is present now in SCM/APO as shown in section 4.1.1), We can now create this material in our warehouse.
Run /SCWM/MAT1
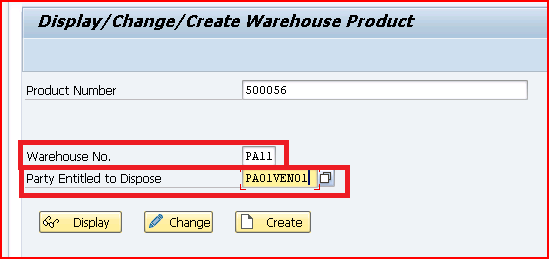
Please check the below post for configuration of “Party Entitled to Dispose”
How to Integrate SAP EWM Warehouse in 7 Easy Steps
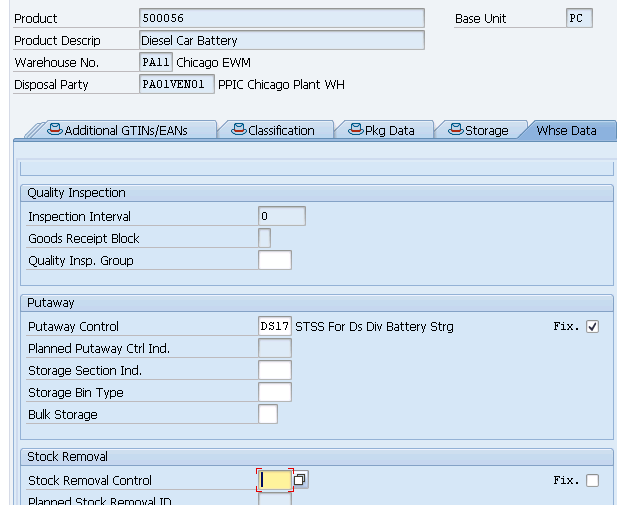
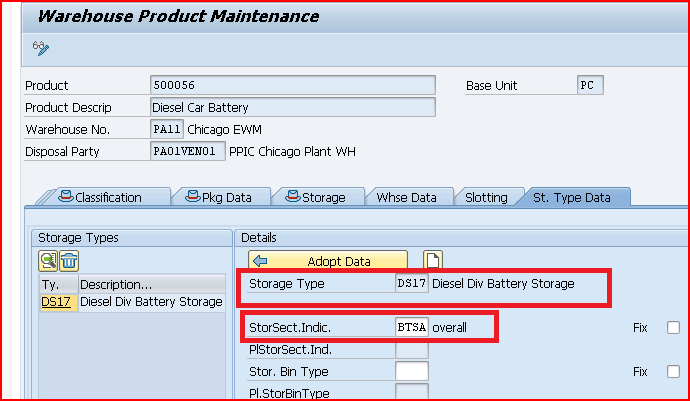
Give the required data in “warehouse data” & “ST. Type Data” view
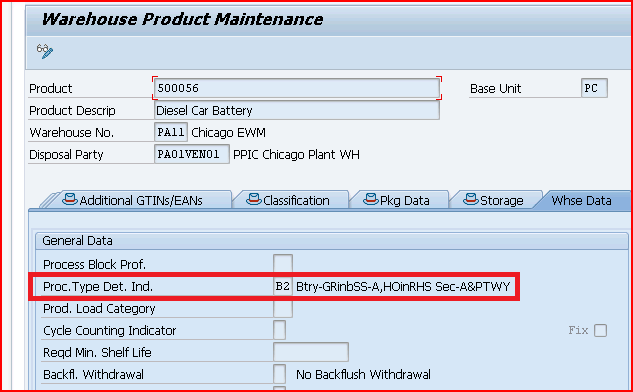
input “Put away Control indicator” & “Removal Control Indicator”
in “ST.Type Data”, input Storage type & storage section indicator
4.2 Creating Material for Decentralized EWM on S4 HANA.
To create the material in decentralized EWM, we use ALE/IDOC technique.
--> Since decentralized EWM is a separate server so there is a sender system (S4 HANA) and a receiver system (EWM) involved in Creation of a Material for Decentralized EWM on S4 HANA.

--> Please note that SAP ERP/S4 is always the sender system, and decentralized EWM. is always the receiver system.
4.2.1 Material Creation in SCM/APO
As explained material needs to be created first at global level in SCM/APO of the decentralized EWM server.
This is done through ALE/IDOC.
We will review here the full process of material creation.
Note: We will not explain the process of ALE set up as nothing special in it. It is just a general ALE set up which is used normally in SAP
4.2.1.1 Creating Reduced Message Types in ERP System
We will see the reduced message type MATMAS in detail in a separate post.
5. Creating the material for Specific Business Process
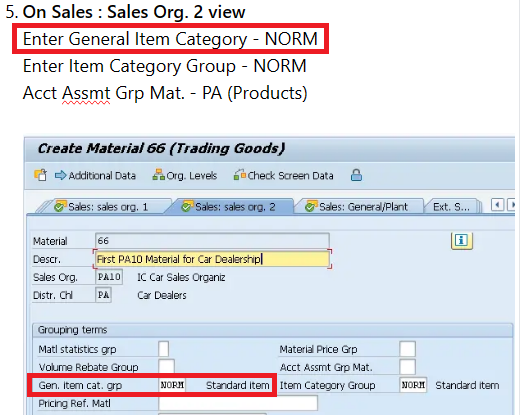
If there is a specific business process needs to be determined for a material (specially in outbound/inbound delivery), then this is decided through field “Gen. item cat. grp” on “Sales: sales org 2” view of the material.
5.1 General Purpose Material
For a normal business process. the value of this field is given as “NORM” as used in the above section of the post.
5.2 Specific Purpose Material
When there is a special business process to be used, the value of the field “Gen. item cat. grp” is different.
For example
--> Some Example of "Gen. item cat. grp" value for specific business process

       NLAG --> "Non-stock material"
       ERLA -->	Structure/Mat. Above
       ERLB --> Structure/Mat. Above
       LEER -->	Empties
       LEIH	--> Returnable Packaging
       VERP--> Packaging
5.2.1 “Gen. item cat. grp” for Spare Parts Specific Business Purpose
We have used general item category for our material 700007106 which is specifically created as spare part for spare part specific purpose.
We used “YSPR” for this field for the spare parts
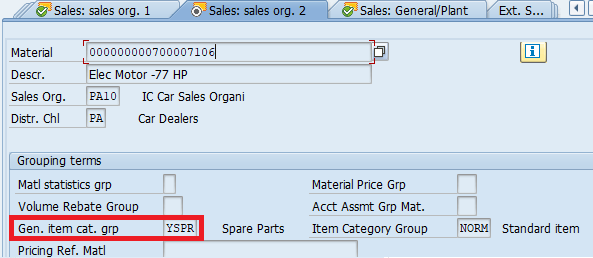
--> The above field is used to To determine different line item category "YSPR" for the spare parts materials from the the standard line item category "YELN", we have to input different "item category" in the material master of spare parts materials. Please check the below link to see this in detail

Configure SAP S4 HANA Sales Documents in 10 Minutes-Item Category Determination in Special Process Inbound Delivery
5.2.2 “Gen. item cat. grp” for Third Party Sales
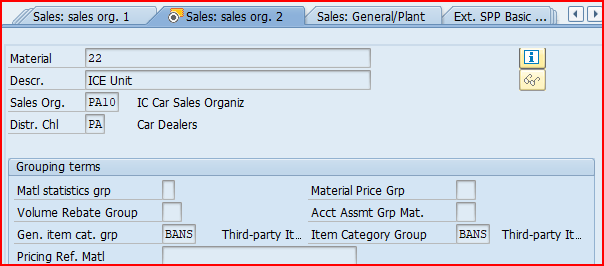
We use Item category Group as “BANS” for the third party sales process. The rest of the material creation process will same as HAWA as given HERE
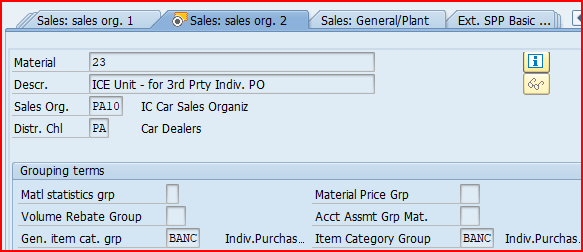
5.2.3 “Gen. item cat. grp” for Third Party Individual PO
We use Item category Group as “BANC” for the third party sales process. The rest of the material creation process will same as HAWA
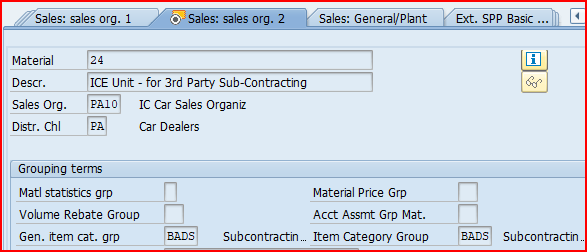
5.2.4 “Gen. item cat. grp” for Third Party Subcontracting
We use Item category Group as “BADS” for the third party sales process. The rest of the material creation process will same as HAWA
6. Creation of Finished Goods for Production Order (FERT)
Here we will create a finished good material to use in our production order
Step 1
Go to MM01 and enter below on the Create Material (initial screen)
- Material Code – “Internally Generated”
- Material Type -FERT
- Industry Sector – M Mechanical Engineering
Press Enter
Step 2
Select the views to be created (Presented from the material type config OMS2). Enter organization structure in which material is to be created
- Plant -PA10 (PPIC Chicago Plant)
- Sales Org -PA10 (IC Car Sales Organization)
- Distribution Channel – PA (Car Dealer
Press Enter
Step 3
On “Basic Data 1” view
- Enter Description – “Finished Car Model D“
- Enter BUOM – EA
- Enter Division – PC (Petrol Car)
- Enter Material Group – PA10 (IC Car Parts Light)
- Gross Weight – 2000 KG
- Net Weight – 1900 KG
Step 4
On Sales : Sales Org. 1 view
- Enter Delivering Plant -PA10
- Enter Tax Classification -1 (Taxable)
Step 5
On Sales : Sales Org. 2 view
- Enter General Item Category – NORM
- Enter Item Category Group – NORM
- Acct Assmt Grp Mat. – PA (Products)
Step 6
On Sales : General/Plant view
- Enter Availability Check -KP (No Check)
- Enter Batch Management -Selected
- Enter Batch management(Plant) – Selected
- Enter Transportation Group – PA10 (Normal Transport)
- Enter Loading Group -PA10 (Manual Load)
Step 7
On MRP 2 view
- Enter “Prod. Stor. location -PP1B (This will be the production supply SLOC from where material for production will be supplied)
- Enter “Storage loc. for EP” as -PP1A -Std. SLOC, (This will be defaulted in PO and flows to the subsequent Inbound Delivery).
Please note that if we want this material to be handled in EWM, then we need to select a Storage location, connected with EWM warehouse in the field “Storage loc. for EP”.
Step 8
On Plant Data / Stor. 1 view
Enter Storage Condition as P1 (IM Managed stock) – Based on this we can configure different picking SLOC , based on if SLOC is IM managed, WM managed or EWM
Step 9
Accounting 1 View
- Enter Valuation Class as 7920 -Finished Products
- ML Active checkbox – should be already selected and greyed out. (If this is not selected then stop here and check ML activation through below given link to the corresponding post).
- Enter price control “V”/”S” and price as 50000 USD.
7. Creation of SFG for Production Order (HALB)
Here we will create a semi-finished good (Assembly) material to use in our production order
Step 1
Go to MM01 and enter below on the Create Material (initial screen)
- Material Code – “Internally Generated”
- Material Type -HALB
- Industry Sector – M Mechanical Engineering
Press Enter
Step 2
Select the views to be created (Presented from the material type config OMS2). Enter organization structure in which material is to be created
- Plant -PA10 (PPIC Chicago Plant)
- Sales Org -PA10 (IC Car Sales Organization)
- Distribution Channel – PA (Car Dealer
Press Enter
Step 3
On “Basic Data 1” view
- Enter Description – “Chassis Model D“
- Enter BUOM – EA
- Enter Division – PC (Petrol Car)
- Enter Material Group – PA10 (IC Car Parts Light)
- Gross Weight – 600 KG
- Net Weight – 550 KG
Step 4
On Sales : Sales Org. 1 view
- Enter Delivering Plant -PA10
- Enter Tax Classification -0 (Exempt)
Step 5
On Sales : Sales Org. 2 view
- Enter General Item Category – NORM
- Enter Item Category Group – NORM
- Acct Assmt Grp Mat. – PA (Products)
Step 6
On Sales : General/Plant view
- Enter Availability Check -KP (No Check)
- Enter Batch Management -Selected
- Enter Batch management(Plant) – Selected
- Enter Transportation Group – PA10 (Normal Transport)
- Enter Loading Group -PA10 (Manual Load)
Step 7
On MRP 2 view
- Enter “Prod. Stor. location -PP1B (This will be the production supply SLOC from where material for production will be supplied)
- Enter “Storage loc. for EP” as -PP1A -Std. SLOC, (This will be defaulted in PO and flows to the subsequent Inbound Delivery).
Please note that if we want this material to be handled in EWM, then we need to select a Storage location, connected with EWM warehouse in the field “Storage loc. for EP”.
Step 8
On Plant Data / Stor. 1 view
Enter Storage Condition as P1 (IM Managed stock) – Based on this we can configure different picking SLOC , based on if SLOC is IM managed, WM managed or EWM
Step 9
Accounting 1 View
- Enter Valuation Class as 7900 -Semi finished products
- ML Active checkbox – should be already selected and greyed out. (If this is not selected then stop here and check ML activation through below given link to the corresponding post).
- Enter price control “V”/”S” and price as 9999 USD.
8. Creation of Raw Material for Production Order (ROH)
Here we will create a RAW material (Component) to use in our production order
Step 1
Go to MM01 and enter below on the Create Material (initial screen)
- Material Code – “Internally Generated”
- Material Type -ROH
- Industry Sector – M Mechanical Engineering
Press Enter
Step 2
Select the views to be created (Presented from the material type config OMS2). Enter organization structure in which material is to be created
- Plant -PA10 (PPIC Chicago Plant)
- Sales Org -PA10 (IC Car Sales Organization)
- Distribution Channel – PA (Car Dealer
Press Enter
Step 3
On “Basic Data 1” view
- Enter Description – “Tail Lights“
- Enter BUOM – KG
- Enter Division – PC (Petrol Car)
- Enter Material Group – PA10 (IC Car Parts Light)
- Gross Weight – 5 KG
- Net Weight – 4 KG
Step 4
On Sales : Sales Org. 1 view
- Enter Delivering Plant -PA10
- Enter Tax Classification -1 (Taxable)
Step 5
On Sales : Sales Org. 2 view
- Enter General Item Category – NORM
- Enter Item Category Group – NORM
- Acct Assmt Grp Mat. – PA (Products)
Step 6
On Sales : General/Plant view
- Enter Availability Check -KP (No Check)
- Enter Batch Management -Selected
- Enter Batch management(Plant) – Selected
- Enter Transportation Group – PA10 (Normal Transport)
- Enter Loading Group -PA10 (Manual Load)
Step 7
On MRP 2 view
- Enter “Prod. Stor. location -PP1B (This will be the production supply SLOC from where material for production will be supplied)
- Enter “Storage loc. for EP” as -PP1A -Std. SLOC, (This will be defaulted in PO and flows to the subsequent Inbound Delivery).
Please note that if we want this material to be handled in EWM, then we need to select a Storage location, connected with EWM warehouse in the field “Storage loc. for EP”.
Step 8
On Plant Data / Stor. 1 view
Enter Storage Condition as P1 (IM Managed stock) – Based on this we can configure different picking SLOC , based on if SLOC is IM managed, WM managed or EWM
Step 9
Accounting 1 View
- Enter Valuation Class as 3000 -RAW Products
- ML Active checkbox – should be already selected and greyed out. (If this is not selected then stop here and check ML activation through below given link to the corresponding post).
- Enter price control “V”/”S” and price as 50 USD.
Note:
Please see below post to check how the FG, SFG & Raw Material created above are used in the BOM and subsequently in the production order
How to Configure Base PP Cycle in 5 Minutes
We have created the below FG, SFG & Raw materials
Assembly (Semi Finished)-Chassis Model D (Material 500000023)
- Component-Tail Lights (Material-500000007)
- Component-Boot Insulation (Material-500000008)
Assembly (Semi Finished)-Car Boot Model D (Material 500000021)
- Assembly (Semi Finished)-Chassis Model D (Material-500000023)
- Component-Rear Tires (Material no.-500000018)
Finished Product (Car model D, Material-500000027)
- Component-Electric Wires (Material-500000019)
- Assembly (Semi Finished)-Car Boot Model D (Material-500000021)
- Component-Petrol (Material-500000026)
- Component-Engine Assembled (Material-500000009)
Now we will activate QM view for the component Tail lights.
9. Creation of QM view for QM-MM Interface
Since component Tail Lights (Material-500000007) is purchased from the vendor so we need to inspect it at the time of goods receipt
We need to assign inspection type “01” in material master QM view
Go to MM01 and enter material 500000007, select QM view and input plant PA10
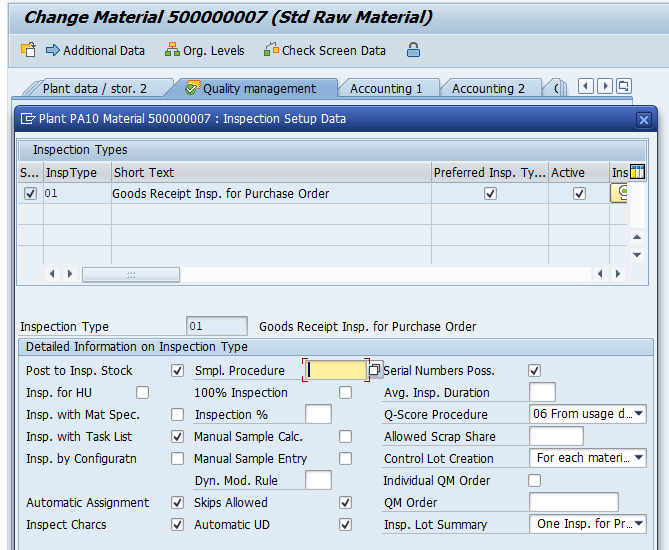
As soon as we select the inspection type “01” in QM view of material master, the fields selected in the configuration will be activated by default
Please see the below post for detail
How to Configure & Test QM in Procurement-Define Default Values for Inspection Type
9.2 QM In Procurement Active Checkbox
If we set this indicator then “QM in procurement” is activated for all the plants pertaining to a client.
--> If we activate QM in procurement indicator in the material master record (Which is at the client level), we must also input "Quality Procurement Key" at the plant level for quality management in procurement.
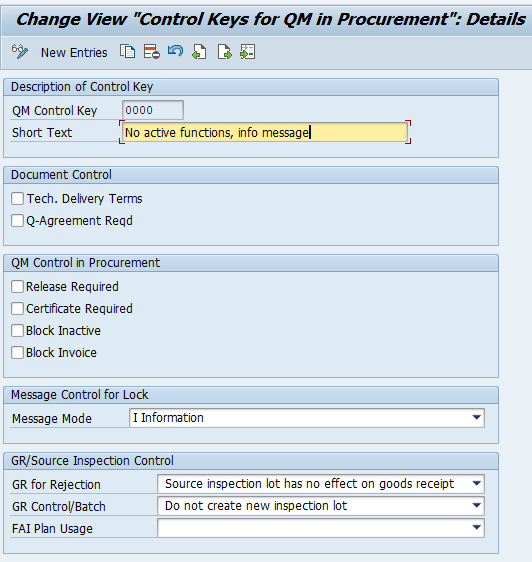
9.2 QM Control Key
This key determines all the conditions which are valid for quality management in procurement.
To configure the QM procurement key , follow the below path
SPRO –> Quality Management –> QM in Logistics –> QM in Procurement –> Define Control Keys for QM in Procurement
We have configured the below key for our materials
In the previous post, we have activated Material Ledger in 5 Easy Steps. Click on the above link to read in detail.
In the next Post we will load GL master. GL accounts will be required to create/configure further process like BP, MM-FI Integration etc. Click on the above link to read in detail.


