In this post we will explain how to upload GL Accounts on SAP S4 HANA. We will first download the template to upload GL Accounts on SAP S4 HANA. Then We will complete the template with our GL master data. Finally we will upload GL Accounts on SAP S4 HANA.
Besides this we will create all the main GL accounts manually so that we will not be dependent on the upload.
Time needed: 5 minutes
How to Upload GL Master in 5 Minutes in Three Easy Steps
- Step 1-Preparing Template to upload GL Account
1.1)-Create Account Group
1.2)-Single GL Account Creation to Check Errors in Configuration
1.3)-Defined Retained Earning Account - Step 2-Uploading Completed GL Account Template to PA10 Company Code
2.1)-Starting S4 HANA Data Migration Cockpit.
2.2)-Create Controlling Area (PPIN – PP INC Controlling Area)
2.3)-Assigning Controlling Area (PPIN) to Company Code (PA10 & PP10) - Step 3-Extension of GL Accounts to PP10 Company Code
Extension of all loaded GL accounts from PA10 to PP10 through FS15
- Appendix – Creating main GL Accounts manually
Before having an overview of all the 3 steps involved in Upload GL Master in 5 Minutes in Three Easy Steps, let’s first have a glance of the pre-requisite configurations and related post.

Link to Pre-requisite Configuration post is given below
Once we have completed all the above configurations, we are ready to upload GL Master in S4 HANA
Let’s now look in detail, how to Upload GL Master in 5 Minutes in Three Easy Steps
Table of Contents
Step 1 : Preparing Supporting Configuration to upload GL Accounts
In this post we will first prepare template to load GL master data on SAP S4 HANA. After that we will load the prepared file onto SAP S4 HANA.
Mark my words. This is going to be a very exciting journey. Let’s start it !
1.1 Create Account Group
To create/load the GL master we need to create account groups for our GL accounts. SAP account groups are used to maintain intervals, segregate G/L accounts groups, and define field statuses. SAP account group has a four-digit alphanumeric code and serves for organization of G/L account master data based on specifications on how G/L account master data to be defined.

Below Account Groups are created for PPIN Chart of Accounts
| Chrt/Accts | Acct Group | Name | From acct | To account |
| PPIN | ABST | Recon.account ready for input | 9999999 | |
| PPIN | ANL. | Fixed assets accounts | 9999999 | |
| PPIN | ERG. | Income statement accounts | 99999999 | |
| PPIN | FIN. | Liquid funds accounts | 99999999 | |
| PPIN | MAT. | Materials management accounts | 99999999 | |
| PPIN | SAKO | G/L accounts (general) | 99999999 | |
| PPIN | SASL | G/L accounts (ledger-spec. OI) | 99999999 |

1.2 Single GL account creation to check errors in Supporting configuration
Now let’s first create a single GL account to iron out any error before proceeding for mass upload of GL account
Insert T-code “FS00” on SAP easy access screen
try to create a demo GL “12345678” in Co.Code PA10
Got below error

let’s analyse where the issue is , just click on “?” on the above message and further click on “Customizing” icon as shown in below screen

Click on “Continue w/o Specifying Project”

Now system is telling us that issue is- We did not define Retain earning account

Retained Earnings Account is used to carry forward the balance from one fiscal year to the next fiscal year. You can assign a Retained Earning Account to each P&L account in the chart of accounts (COA). To automatically carry forward the balance to the next fiscal year, you can define P&L statements as per COA and assign them to the retained earning accounts.
1.3 Define Retained earning account


Note : You can defined GL account while GL accounts are yet to be created. System will warn you that “GL does not exist” just ignore and proceed.
Now again try to create our dummy GL account to look for any error in GL creation.
We have successfully created our Dummy GL , this indicates there is no error in configuration now and we are ready for mass creation of GL account

Step 2 : Downloading & Uploading Completed GL Account Template
2.1 Downloading S4 HANA GL Account Master Upload Template
We need to first down load the template for GL account master through S4 HANA Migration Cockpit (LTMC)
2.1.1 S4HANA Data Migration Cockpit (LTMC).
There are several advantages of the S4HANA Migration Cockpit over LSMW, like- no need to create source structures, target structures and mappings, No screen recording, facility to download user friendly templates, Error details etc.
Go to LTMC and create a new project “PPIN GL Upload PA10”

Select Migration Object as “GL” and click on download template

Download the template and filled your GL data. Our completed file for PPIN COA is given below. You can reference this to create your own GL master. Please feel free to contact if you need guidance on any stage of the data load.
2.2 Complete the Template with GL account Master Data
We have completed the GL master for our Company code PA10 & Charts of account PPIN
2.2.1 S4 HANA 1809/1909
For S4 HANA 1809/1909 please download the completed GL master from the below download button
2.1.2 S4 HANA 2020
For S4 HANA 2020 please download the completed GL master from the below download button
Upload the filled Template
Upload the file click on “Activate” and then on “start Transfer”


System will validate the data as shown below

system will ask you to confirm mapping values. Select all line and click on Confirmed Mapping Values as shown in below screenshot

All error gone leaving one for “Controlling Area”. We did not create Controlling area yet. It is mandatory to load GL account. Let’s check our template

Configure controlling area PPIN as per post Configure SAP FI Org Structure in 5 Minutes
Now input this new controlling area value in our S4HANA migration cockpit and continue loading GL master

Now all errors gone 🙂

All GLs are uploaded successfully in company code PA10
Now we will extend these GLs to our other company code PP10
Step 3 : Extension of GL Accounts to PP10 Company Code (FS15)
Input the data as shown in the below screenshot

System is checking and extending GL codes to PP10 company codes

Now all the GL accounts are extended to Company code PP10
To read more about Data Transfer Cockpit (LTMC) on SAP help , Please click HERE
Appendix 1 : Migration of GL accounts through App
For the new versions of SAP S4 HANA, upon running of LTMC , we receive the below error
--> It is no longer possible to migrate data using transaction LTMC. It is still possible to display existing projects, but new projects cannot be created.
You can use the app Migrate Your Data – Migration Cockpit to migrate data to SAP S/4HANA. You can access this app in the Fiori launchpad.
Let’s load the GL data through App migrate Your Data – Migration Cockpit to migrate data to SAP S/4HANA
Appendix 2 : Creating main GL Accounts manually
There are 100s of GL accounts in the GL master used by a business. From logistics points of view only few are important which are used in MM-FI or SD-FI integrations etc.

In addition to the creation of GL master through upload as explained in the above post, we will create some chosen few GL through manual creation showing screenshots of the full process.
1. Vendor Master Recon Account
we will create account 221100000 named “PPIN-Payables Domestic” to use in the BP vendor master creation.
Click HERE to check it.s use.
Start FS00
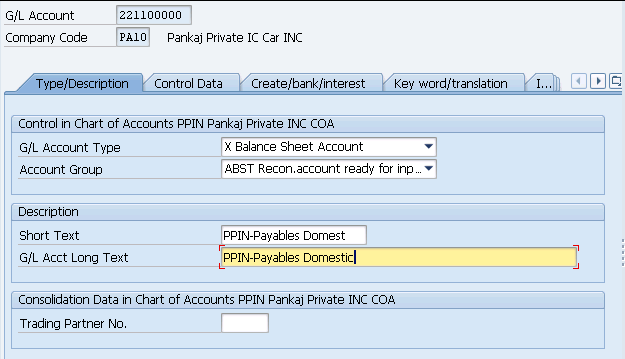
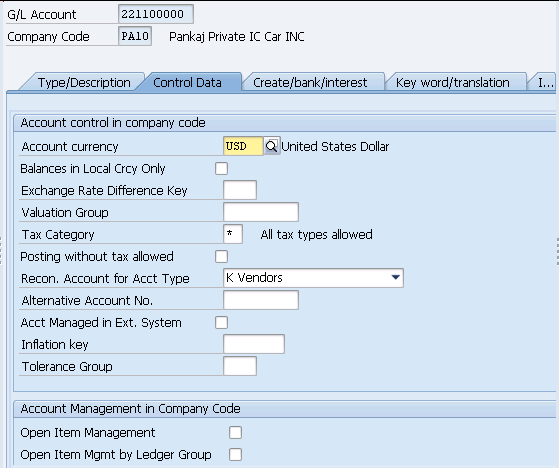
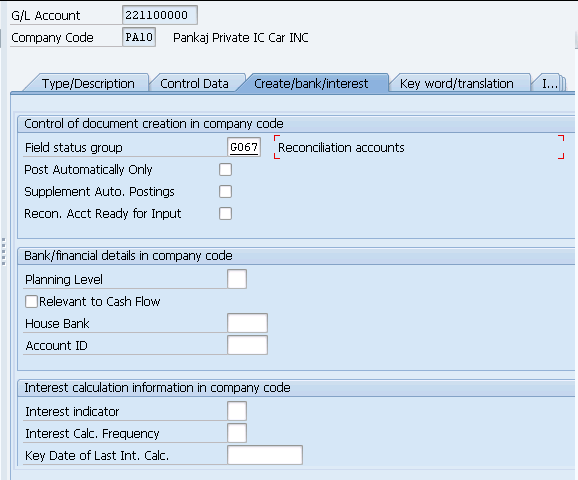
GL 221100000 created. Also extend the account to PP10 Co.code too through t-code FS15
2. Customer Master Recon Account
we will create account 112100000 named “PPIN-Receivables Domestic” to use in the BP customer master creation.
Click HERE to check it.s use.
Start FS00
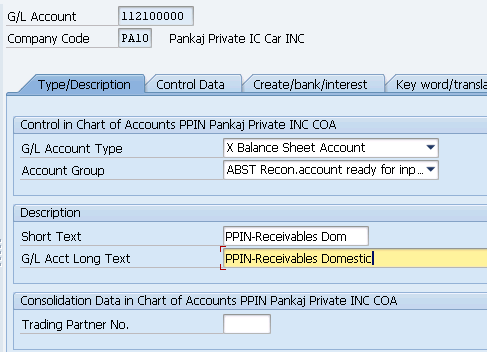
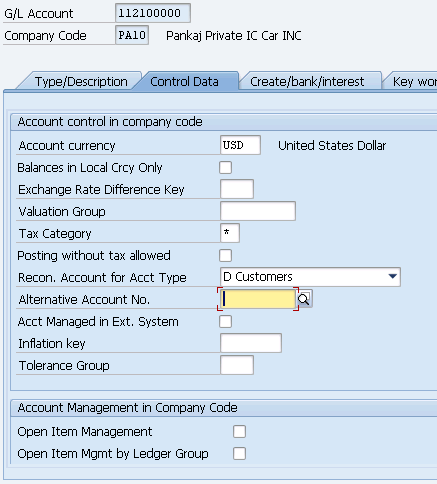
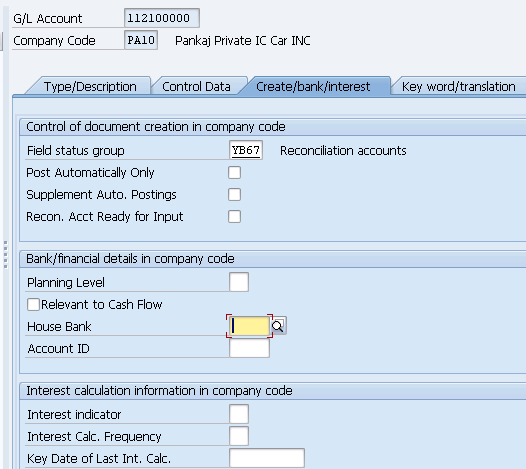
Also extend the account to PP10 Co.code too through t-code FS15
3. Inventory Posting Account (BSX)
BSX is used for all postings to stock accounts.
3.1 Trading Goods (HAWA)
BSX posting is done on GL 113600000 (Inventory Trading goods)
Let,s create GL 113600000
Start FS00
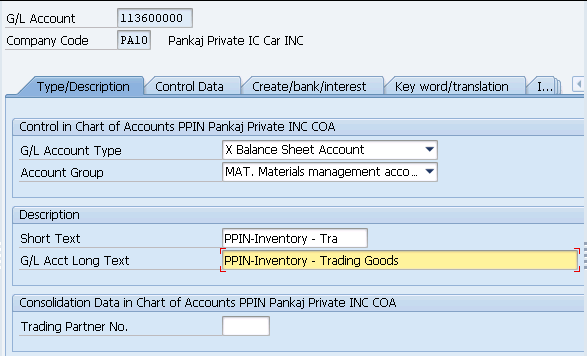
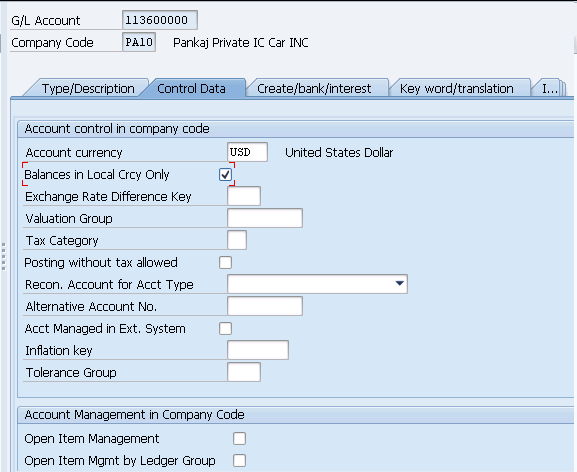
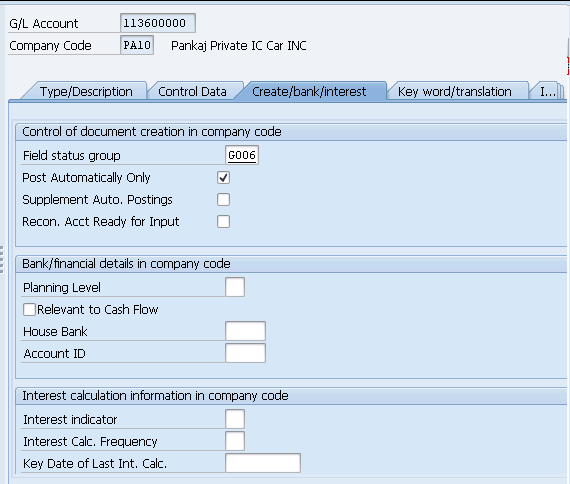
GL 113600000 (Inventory Trading goods) is created now.
Click HERE to see the use of GL 113600000 (Inventory Trading goods)
3.2 Raw Material (ROH)
BSX posting is done on GL 113100000 (Inventory Raw Material)
Let’s create GL 113100000

3.3 Semi-Finished Material (HALB)
BSX posting is done on GL 113300000 (Inventory Semi-Finished Material)
Let’s create GL 113300000

3.4 Finished Material (FERT)
BSX posting is done on GL 113400000 (Inventory Finished Material)
Let’s create GL 113400000
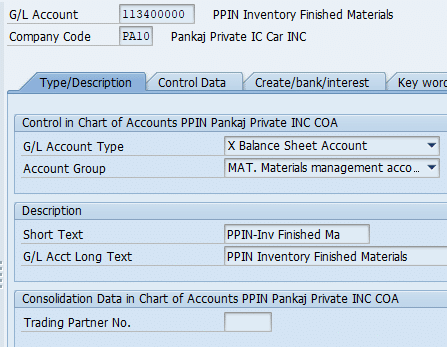
4. WRX – GR/IR clearing account
When posting the goods receipts for standard purchase order, the stock account is debited (BSX account). The offsetting entry is posted to the GR/IR clearing account through the WRX key.
Note : The purchase order must not have an account assignment
Let,s create GL 221120000 PPIN-Goods Received/Invoice Received
start FS00
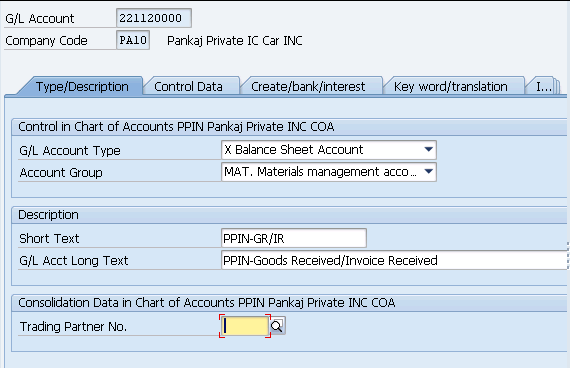
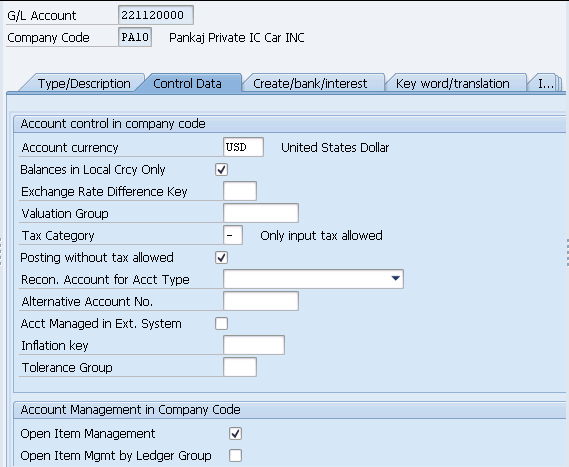
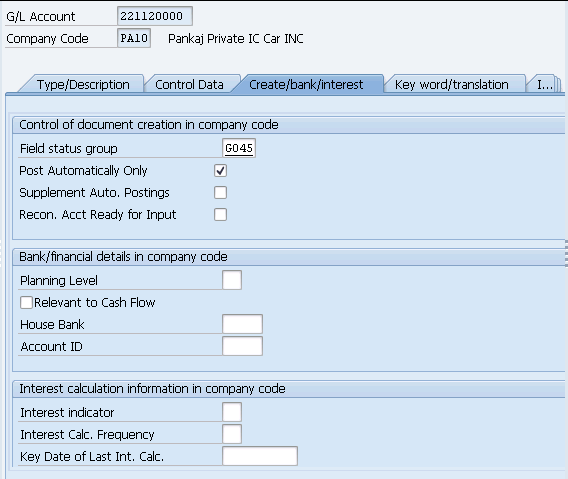
GL 221120000 PPIN-Goods Received/Invoice Received is created now.
Click HERE to see how this account is used in MM-FI configuration
5. FR1-Freight Clearing Account
If our PO have been given Freight condition type (Example-Condition “FRC1”) so system will search corresponding GL to post it to FI
System is searching for Key FR1 because in our pricing schema for our car business we have used key FR1 for condition “FRC1”.
Please check the pricing schema from the link to the post given below
Ultimate Guide to MM Pricing in 5 Easy Steps
We will use GL 221730000-PPIN-Freight Clearing Account (MM)
Let,s create GL 221730000-PPIN-Freight Clearing Account (MM)
Start FS00
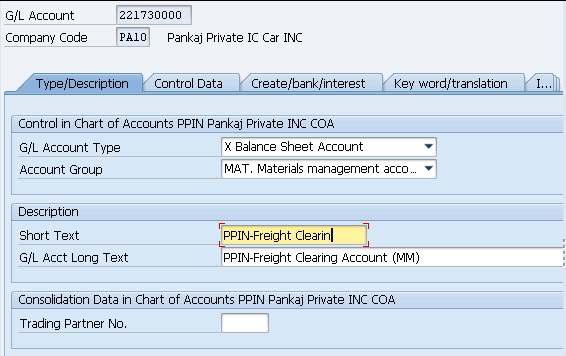
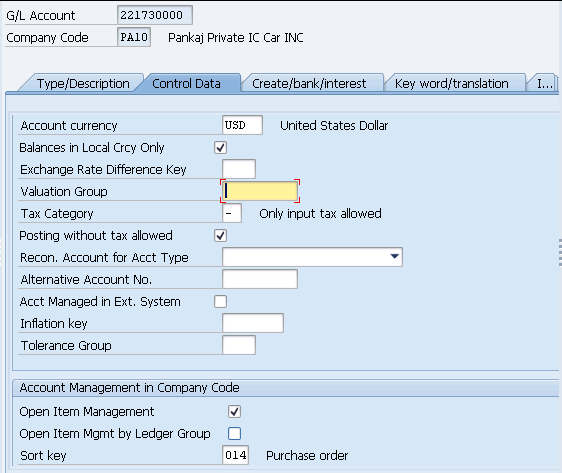
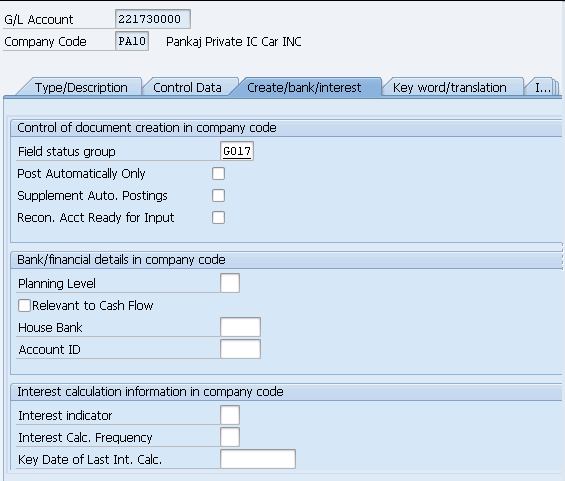
6. Company Code Clearing Account
If we want to do stock transfer between the plants belonging to different company codes then
- The transfer between plants is also a transfer between company codes.
- In this case, the system creates two accounting documents for the transfer posting. The stock posting is offset against a company code clearing account.
6.1 Receivables Affiliated Companies GL Account
We will first create receivable GL account.
Start FS00
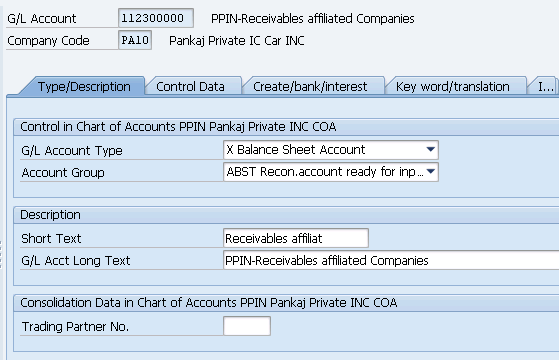
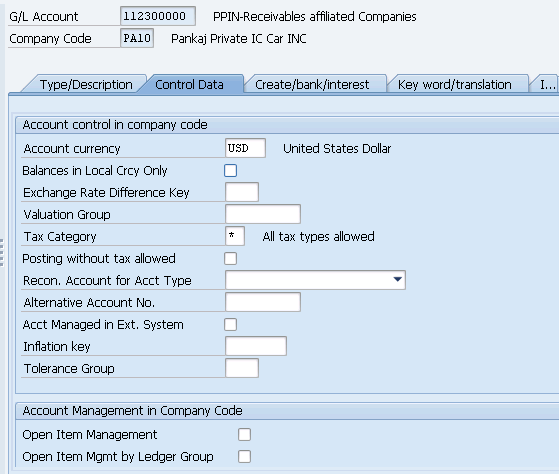
Extend the above account to other company code PP10 as shown in the previous point
6.2 Payable affiliated Companies GL Account
Start FS00
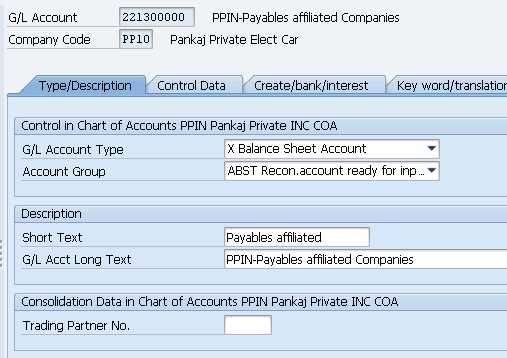
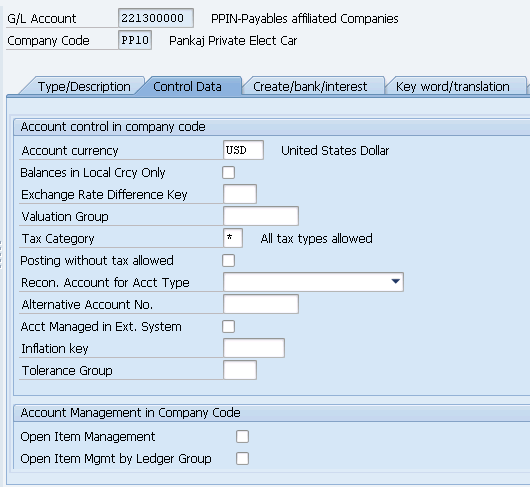
Extend the above account to other company code PP10 as shown in the previous point
7. VAX- Sales Orders Goods issue without account assignment object
We will use GL 550200000 (PPIN-Cost of Goods Sold (Trade w/o Cost Element).
Let,s create GL GL 550200000 (PPIN-Cost of Goods Sold (Trade w/o Cost Element).
Start FS00
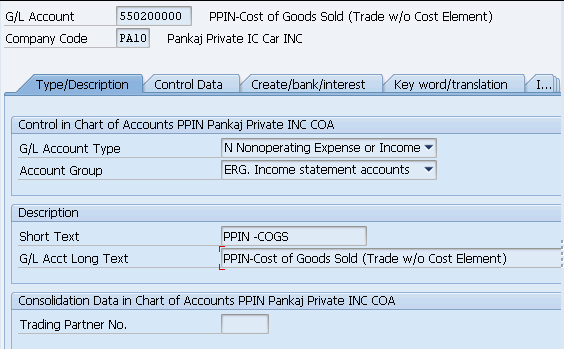
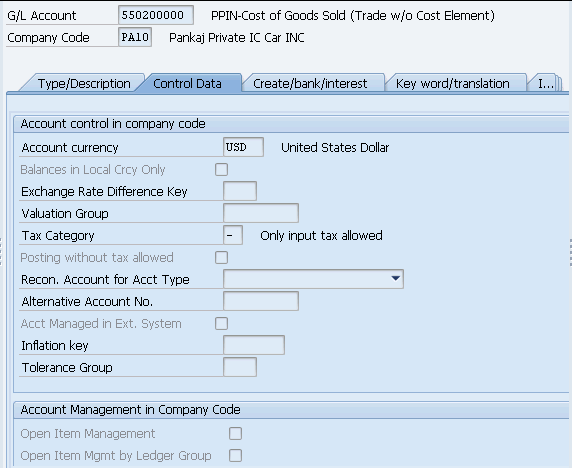
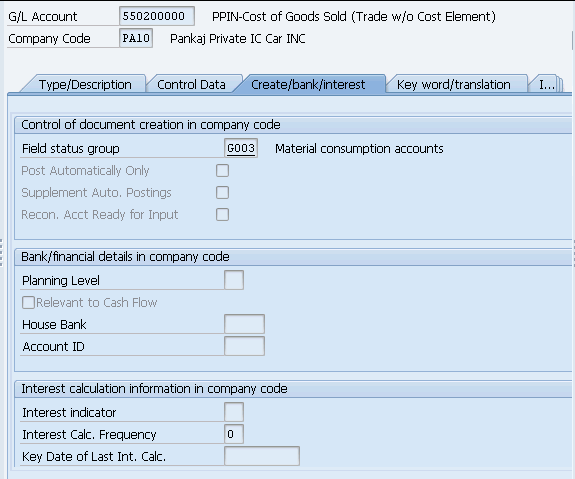
Save & GL 550200000 is created. Now extend this GL to PP10 company also.
8. ERL- GL for Domestic Revenue
We will create GL 441000000 – PPIN-Revenue Domestic – Product
Start FS00
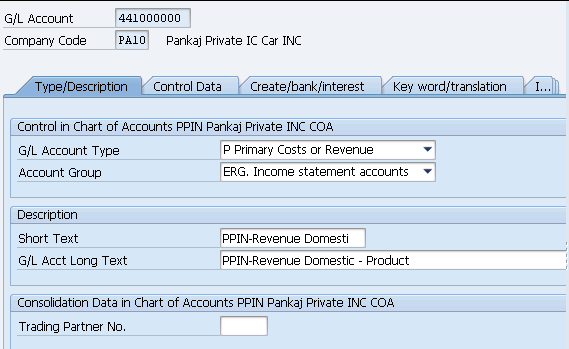
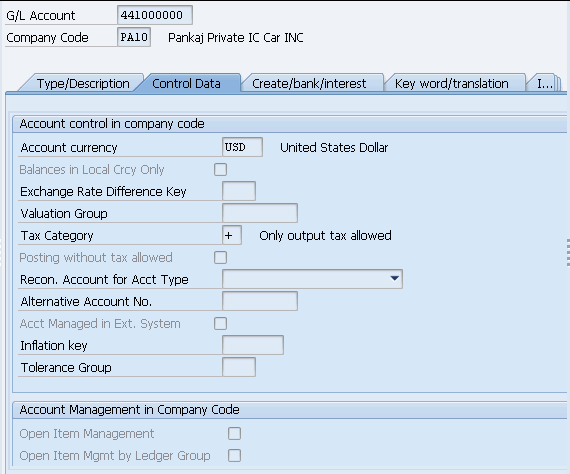
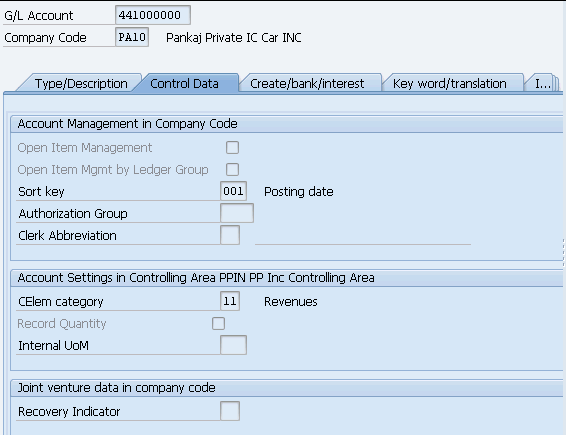
GL 441000000 – PPIN-Revenue Domestic – Product is created now.
We have extended it to company PP10 also through FS15
This account is used in revenue determination . Please see it use HERE
9. ERS- GL for Sales Discounts – Domestic
We will create GL 444002000 -PPIN-Sales Discounts – Domestic
Start FS00
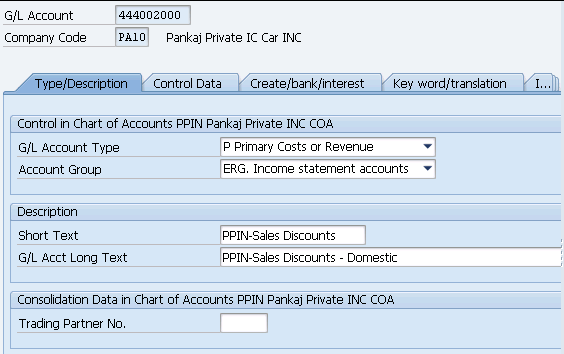
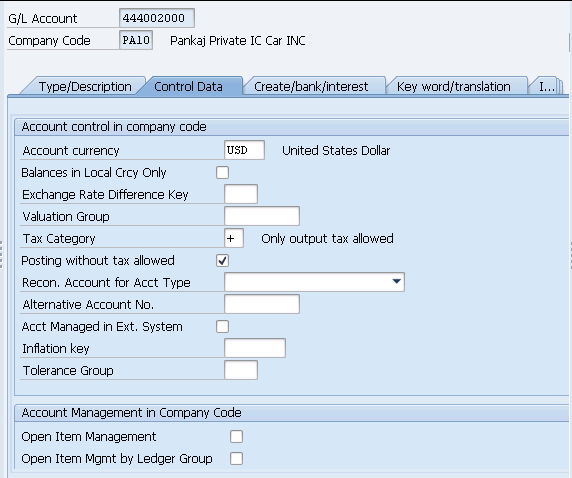
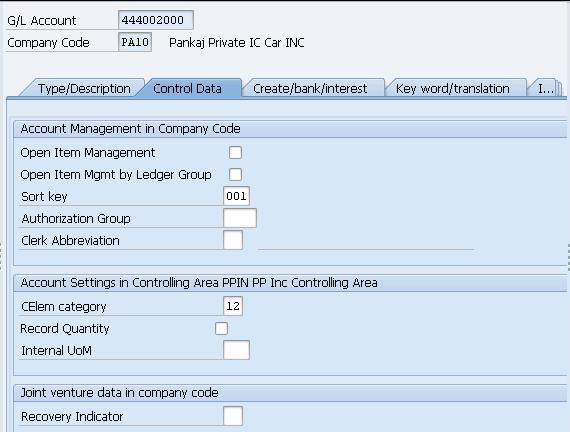
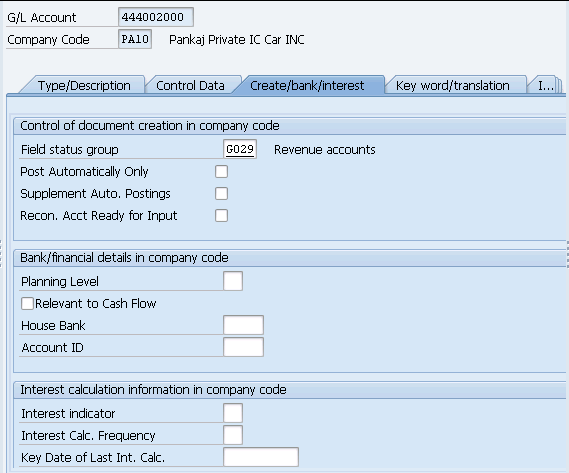
GL 444002000- PPIN-Sales Discounts-Domestic is created now.
We have extended it to company PP10 also through FS15
This account is used in SD revenue determination procedure. Please see it use HERE
10. ERF- GL for Freight Revenue – Recovery
We will create GL 552590000 -PPIN-Freight Revenue – Recovery
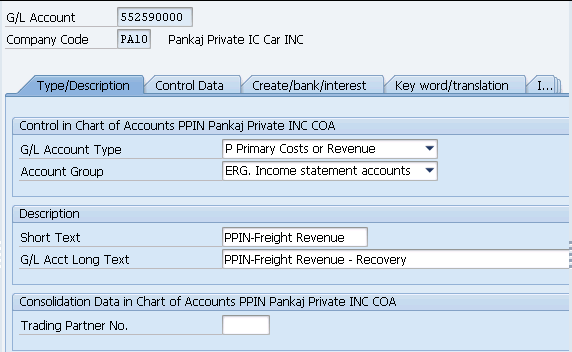
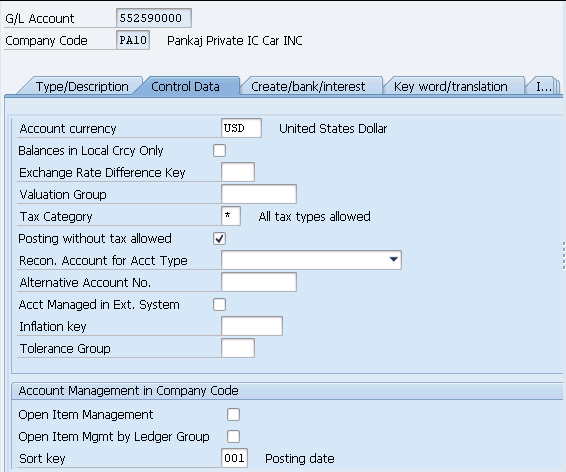
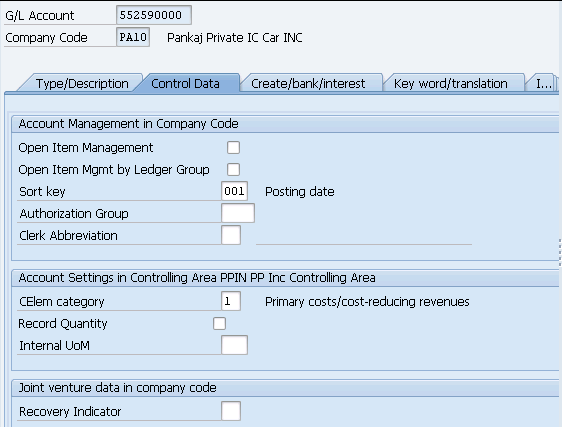
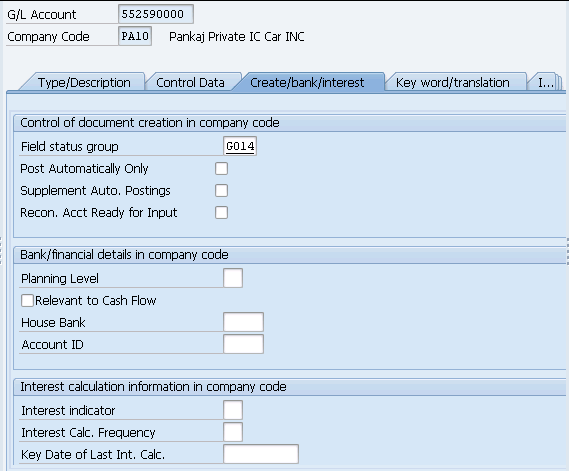
GL 552590000 -PPIN-Freight Revenue – Recovery is created now.
We have extended it to company PP10 also through FS15
This account is used in SD revenue determination procedure. Please see it use HERE
11. MWS-GL for Output Tax
We will create GL 222000000 – PPIN-Output Tax (MWS) to post the tax amount.
start FS00
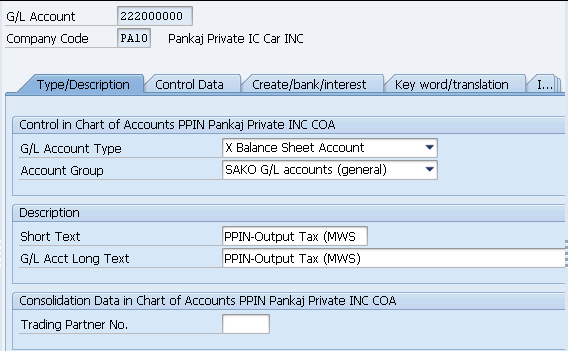
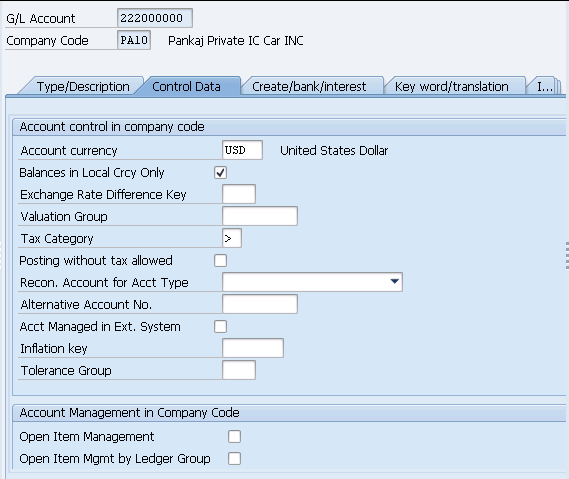
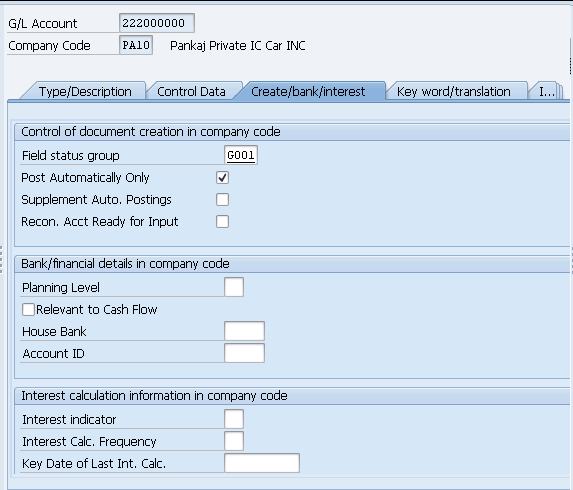
GL 222000000 – PPIN-Output Tax (MWS) to post the tax amount. is created now.
We have extended it to company PP10 also through FS15
This account is used in SD revenue determination procedure. Please see it,s use HERE
11. GBB/BSA-Initial Inventory Upload
We will create GL to post the initial inventory load.
11.1 for RAW material & Returnable Packaging Material
We will use GL 339911000 for Raw & returnable packaging material initial upload.

11.2 For FG & SFG Material
We will use GL 339912000 for SFG & FG material initial upload.

In the previous post we have configured and created our first material required to run our business processes. Click on the above link to read in detail.
In the next Post we will configure Business Partner (BP) & Customer , Vendor integration (CVI) to create the Business Partners (Vendors , Customers etc.). Click on the above link to read in detail.
Image Courtesy : Logo vector created by catalyststuff – www.freepik.com


